A guide to fetching remote archives directly over datacenter network pipelines, recovering accidentally deleted items via the native Recycle Bin, and auditing file modifications through timestamped operational logs.
Enterprise Operations & Safety Controls
Standard web file managers frequently introduce operational risks: accidental permanent deletions cannot be reversed, and transferring large files requires downloading them to a local computer before re-uploading them to the server. The control panel addresses these challenges by introducing server-to-server HTTP downloads, a safe two-stage trash recovery system, and a forensic audit log.
Remote Download
Pulls external archives directly to server storage using datacenter bandwidth.
Recycle Bin
Non-destructive deletion with 1-click restoration to original path.
Audit Logging
Tracks file edits, creations, moves, and security attribute changes.
Step 1: Downloading Files Directly from Remote URLs
Uploading large CMS archives, theme packages, or database dumps from a local workstation can consume significant bandwidth and time. The Remote Download tool allows the server to download files directly from external HTTP or HTTPS endpoints.
- Navigate to the folder where you want the downloaded file to be saved.
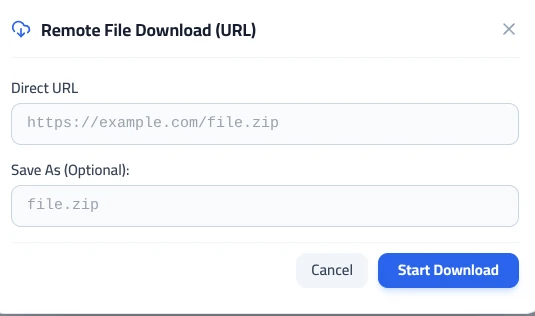
- Click the Remote Download button in the top action bar.
- In the modal, provide the target details:
- Direct URL: Paste the direct download link (e.g.,
https://example.com/package.zip). - Save As (Optional): Specify a custom name for the file on disk, or leave it blank to automatically adopt the remote filename.
- Direct URL: Paste the direct download link (e.g.,
- Click Start Download. The server processes the download asynchronously and places the completed file directly into your current directory.
Direct Link Requirement:
Ensure the URL points directly to the downloadable file payload rather than an intermediate landing page or file-sharing redirection service.
Step 2: Non-Destructive Deletion & Recycle Bin Restoration
To protect against human error and accidental data loss, deleting an item in the file manager transfers it to an isolated staging area rather than permanently unlinking it from the filesystem.
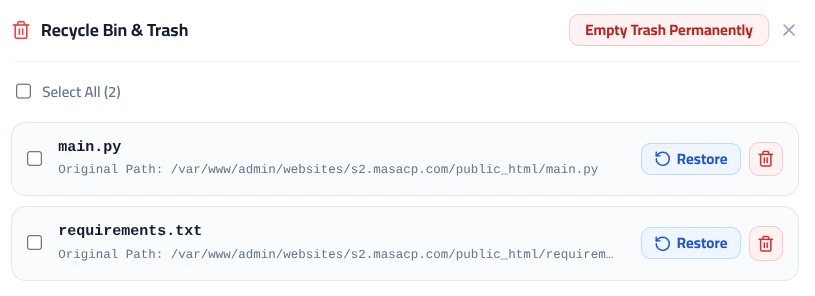
Restoring Deleted Files:
- Click the Recycle Bin button located in the top-right toolbar.
- Locate the deleted file or directory in the list. The modal clearly displays the item name alongside its Original Path.
- Click the blue Restore button next to the item. The control panel immediately relocates the file back to its exact source directory with its original permissions intact.
Purging and Permanent Deletion:
- Individual Purge: Click the red trash icon next to a single item to permanently purge it from disk.
- Empty Trash Permanently: Click the red button at the top right of the modal to wipe all staged items and instantly reclaim disk quota across your account.
Step 3: Tracking Changes via File Operations Audit Log
Security audits and administrative accountability require visibility into file changes. The Audit Logs feature tracks every operational action executed through the web interface.
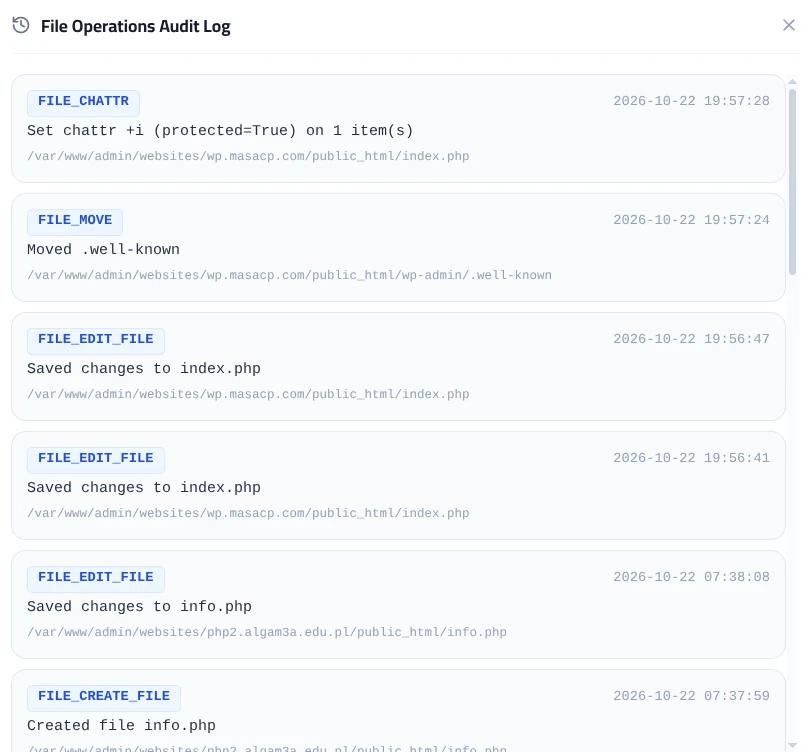
Clicking the Audit Logs button in the top action bar opens a reverse-chronological event timeline. Each log entry provides a distinct badge, operation description, absolute path, and exact timestamp:
| Log Event Badge | Trigger Condition | Recorded Metadata |
|---|---|---|
| FILE_CHATTR | Modifying immutable attributes (toggling chattr +i). |
Target file path and boolean protection state. |
| FILE_MOVE | Moving or renaming a file or directory across folders. | Source path and destination path. |
| FILE_EDIT_FILE | Saving modifications made within the integrated code editor. | Saved filename and absolute directory location. |
| FILE_CREATE_FILE | Creating a new file or uploading an asset. | New filename and destination folder. |
Forensic Investigation Utility:
If an unauthorized modification occurs or a script begins producing syntax errors, reviewing the File Operations Audit Log allows you to immediately pinpoint the exact time the file was saved and verify whether other files were altered during the same session.
Operational Safety Best Practices
- Routine Trash Emptying: Files stored in the Recycle Bin continue to count toward your account storage quota until permanently deleted. Periodically empty the trash after verifying site stability.
- Verifying Remote Download Checksums: When fetching software updates from external URLs, check that the downloaded archive size matches the upstream provider release specifications before extracting.
- Audit Review Prior to Deployment: Check the audit timeline after conducting routine maintenance to ensure no unintended files were moved or left unprotected.