Deploying a WordPress Website
Learn how to deploy a high-performance, secure WordPress website in seconds using the MASACP 1-Click Auto-Installer, complete with automated database provisioning, Cgroups v2 resource isolation, security hardening, and free Let’s Encrypt SSL certificates.
Step 1: Point Your Domain via DNS
Before creating your WordPress site in MASACP, ensure your domain’s DNS records are pointed to your server’s public IP address. You can configure this at Cloudflare, Namecheap, GoDaddy, or your DNS provider:
- A Record: Set
@(or your root domain, e.g.,example.com) pointing to your Server Public IP. - CNAME Record: Set
wwwpointing to@(orexample.com).
Note: If you are using Cloudflare, you can temporarily set the proxy status to DNS Only (Grey Cloud) until the initial Let’s Encrypt SSL certificate is issued, or ensure your SSL/TLS encryption mode is set to Full (Strict).
Step 2: Open the Add Website Modal
- Log in to your MASACP Admin Console.
- Navigate to Websites from the main sidebar.
- Click the Add New Website button in the top right corner.
- Select the WordPress application tab.
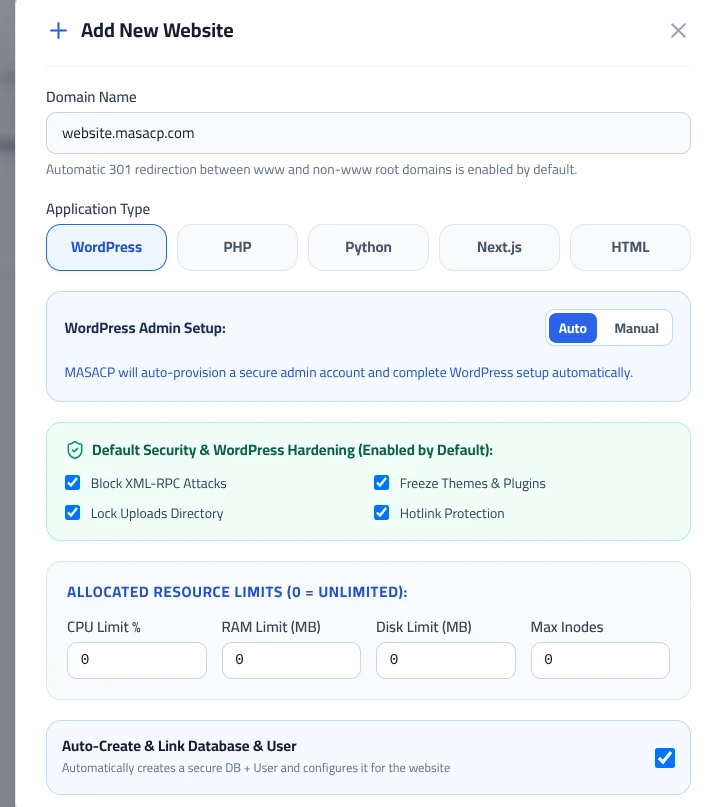
Step 3: Domain & Admin Setup Mode
Enter your primary domain name (e.g., example.com). MASACP offers two installation modes for WordPress administrator credentials:
- Auto (Recommended): MASACP generates a cryptographically secure administrator username, random password, and links your primary admin email automatically.
- Manual: Allows you to manually type your custom WordPress administrator username, password, and contact email.
Step 4: WordPress Security & Hardening Toggles
MASACP comes with enterprise-grade security hardening features built directly into the web server configuration. You can toggle the following protections before creation:
- Block XML-RPC Attacks: Blocks requests targeting
xmlrpc.phpto eliminate brute-force amplification and DDoS attacks. - Freeze Themes & Plugins: Prevents unauthorized PHP script uploads or modifications inside
wp-content/pluginsandwp-content/themesvia the web. - Lock Uploads Directory: Completely disables PHP execution inside the
wp-content/uploads/folder, preventing backdoors from running. - Hotlink Protection: Restricts third-party websites from directly embedding your images and assets, conserving your server bandwidth.
Step 5: Resource Quotas & Allocation (Cgroups v2)
MASACP allows you to assign dedicated hardware quotas to prevent a single site from exhausting server resources. Enter 0 for unlimited allocation:
| Resource Limit | Description | Default |
|---|---|---|
| CPU Limit % | Maximum percentage of CPU cores this website tenant is allowed to consume. | 0 (Unlimited) |
| RAM Limit (MB) | Memory ceiling allocated to the website’s PHP-FPM pool and worker processes. | 0 (Unlimited) |
| Disk Limit (MB) | Storage quota enforced on the site’s document root directory. | 0 (Unlimited) |
| Max Inodes | Maximum total number of files and folders the site can store. | 0 (Unlimited) |
Step 6: Automated Database & SSL Configuration
Ensure both automation options are enabled for a seamless setup:
- Auto-Create & Link Database & User: Automatically generates a dedicated MySQL/MariaDB database, creates an isolated database user with a secure 32-character password, and writes the credentials into
wp-config.php. - Auto-Issue Free SSL Certificate (Let’s Encrypt): Automatically verifies domain ownership via HTTP-01 challenge, issues an SSL certificate, and enforces HTTP to HTTPS 301 redirection.
Step 7: Web Server & PHP Version Selection
- Select Web Server: Choose your preferred engine:
- OpenLiteSpeed: Recommended for WordPress sites to leverage the native LSCache plugin and HTTP/3 QUIC.
- Nginx: High-concurrency event-driven architecture, ideal for standard WordPress configurations with FastCGI caching.
- OpenResty: Enhanced Nginx core with Lua scripting capabilities for advanced traffic filtering.
- Select PHP Version: Select your desired PHP version (e.g., PHP 8.1, 8.2, or 8.3). Each website runs in an isolated PHP-FPM socket.
- Click Create Website.
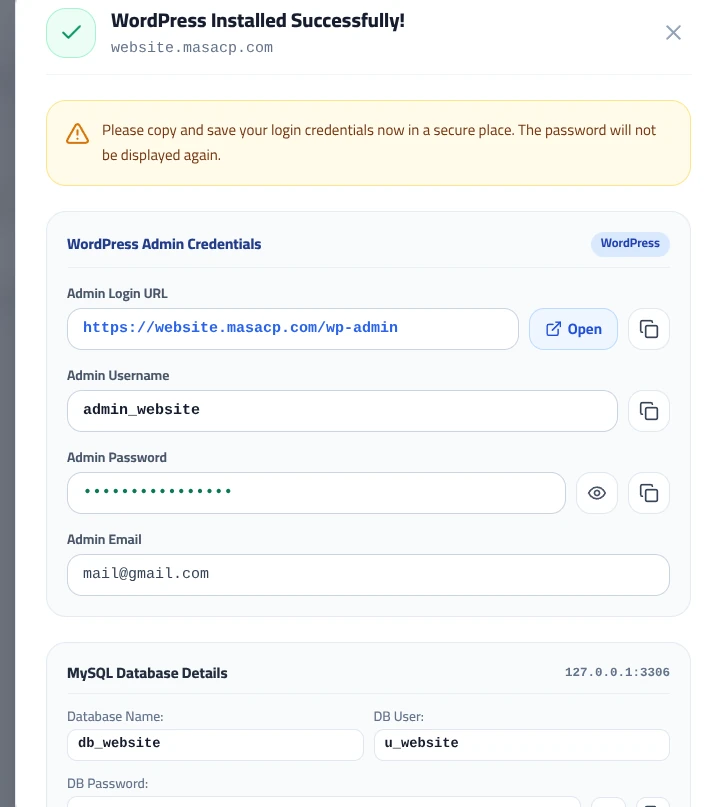
Step 8: Save Your Credentials
Once installation finishes, MASACP displays a success modal containing your generated site credentials. Make sure to copy and save these details immediately:
WordPress Admin Credentials
- Admin Login URL:
https://example.com/wp-admin - Admin Username: The generated administrator login.
- Admin Password: The secure generated password.
- Admin Email: The administrative notifications email.
MySQL Database Details
- Database Name: The isolated database assigned to your site.
- DB User: The database username.
- DB Password: The secure MySQL user password.
Tip: You can manage, update, or backup this database anytime via the Databases section or phpMyAdmin inside MASACP.