Configure a scoped Cloudflare API token with granular DNS permissions, connect individual or global zones within the MASACP DNS Manager, and synchronize A, CNAME, MX, TXT, and DKIM records instantly with zero downtime.
1. Overview and Operational Benefits
Managing DNS records across external dashboards often introduces propagation delays, manual copy-paste errors, and configuration drift between server virtual hosts and public name servers. The MASACP Cloudflare DNS integration bridges your local web hosting control panel directly with Cloudflare Anycast infrastructure via modern scoped API tokens.
Integrating Cloudflare DNS into MASACP delivers key architectural advantages:
- Automated Mail and Web Authentication: When provisioning new websites, staging environments, or mail domains, required A records, CNAME aliases, MX mail routing, SPF, and DKIM public keys are pushed directly to Cloudflare.
- Granular Least-Privilege Security: Relies exclusively on Cloudflare Scoped API Tokens rather than legacy global API keys, ensuring credentials only have access to edit DNS records for designated zones.
- Instant Bi-Directional Synchronization: Trigger manual on-demand syncs or automated background pushes whenever virtual host network interfaces or SSL verification challenge tokens change.
- Intelligent Proxy Awareness: Automatically configures web endpoints for CDN caching and DDoS mitigation while isolating non-HTTP records (such as mail servers and SSH endpoints) to direct routing.
2. Generating a Scoped Cloudflare API Token
To permit MASACP to manage your DNS zone safely, generate a dedicated API token within your Cloudflare dashboard:
- Navigate to the official Cloudflare API Tokens management portal:
https://dash.cloudflare.com/profile/api-tokens. - Log in with your Cloudflare account credentials.
- Click on the Create Token button located at the top right of the tokens table.
- Under the API token templates list, locate the Edit zone DNS template and click the Use template button adjacent to it.
- In the Zone Resources configuration block, define the authorization scope according to your hosting strategy:
- Specific zone: Choose this option to restrict the token to a single domain (recommended for multi-tenant isolation or client-specific VPS nodes). Select your targeted domain from the right-hand dropdown list.
- All zones: Choose this option if your server hosts multiple domains under the same Cloudflare account and you want a single token to manage all synchronized zones automatically.

Security Best Practice:
The Edit zone DNS template automatically configures the minimum required permission: Zone:DNS:Edit and Zone:Zone:Read. Do not grant Account or User level administrative permissions to server tokens.
- Scroll to the bottom of the page and click Continue to summary.
- Review the summary parameters to confirm the zone permissions and target domain.
- Click Create Token.
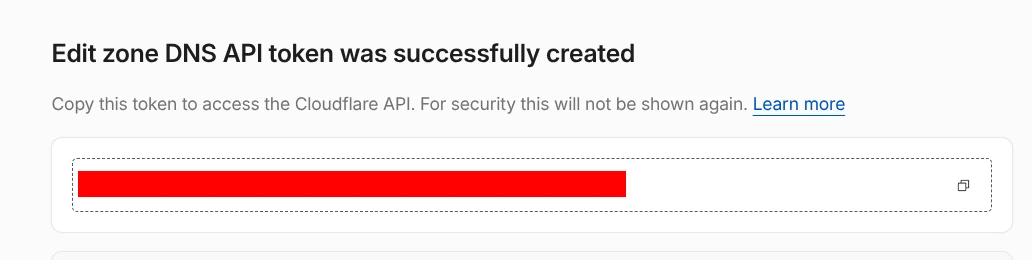
- Cloudflare will display your generated API token string (beginning with
cfut_...). Click the Copy icon to copy it to your clipboard.
Critical Notice:
Cloudflare only displays this token value once upon creation. Store it in a secure password manager or apply it directly to your MASACP server before navigating away from the page.
3. Connecting and Synchronizing in MASACP
Once your scoped API token is generated, link it to your domain zone inside the control panel:
- Log in to your MASACP Control Panel as an administrator or site owner.
- From the primary navigation sidebar, click on DNS Manager.
- In the DNS Manager action toolbar, click the Connect Cloudflare (or Sync Cloudflare) button.
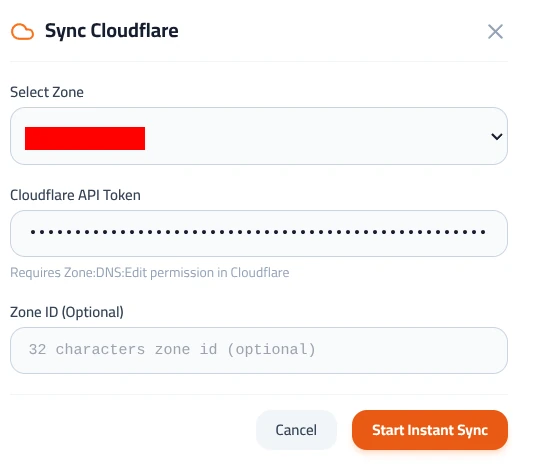
- The Sync Cloudflare modal window will appear. Complete the connection parameters:
- Select Zone: Choose the domain name you wish to synchronize from the local zone dropdown list.
- Cloudflare API Token: Paste your copied token (e.g.
cfut_...) into the input field. MASACP securely encrypts and stores this token. - Zone ID (Optional): If your domain is hosted in an enterprise account with duplicate zone delegations, paste the 32-character hexadecimal Zone ID found on your Cloudflare domain overview page. For standard accounts, this field can safely be left blank as MASACP resolves the Zone ID automatically via API.
- Click the orange Start Instant Sync button.
Upon clicking Start Instant Sync, MASACP executes an immediate two-way validation:
- Validates the authentication token against the Cloudflare API endpoint.
- Fetches all existing remote records for the domain.
- Compiles local DNS records (Web server IP, Mail routing, DKIM public keys, SSL verification challenge TXT records).
- Pushes updated records to Cloudflare Anycast edge servers in real time.
4. Proxy Rules & Record Classification
When managing DNS through Cloudflare, records are routed according to their proxy status:
Proxied (Orange Cloud)
Traffic routes through Cloudflare reverse proxy edge network. Hides origin server IP, activates WAF protection, enables Brotli compression, and caches static assets.
DNS Only (Grey Cloud)
Direct resolution to origin server IP address without reverse proxying. Mandatory for protocols not supporting standard HTTP/HTTPS proxying.
Important Mail Routing Rule:
Never set the mail.yourdomain.com A record or any MX record to Proxied (Orange Cloud). Cloudflare free and standard proxies only forward HTTP/HTTPS traffic on specific web ports; proxying mail records will break inbound and outbound email delivery.
5. Verification and Troubleshooting
If the synchronization fails or displays an error banner, review the following troubleshooting checks:
Error: 10000 Authentication Error / Invalid Token
The token was either revoked, expired, or copied with trailing whitespace characters. Generate a fresh token in Cloudflare and paste it without leading/trailing spaces.
Error: Zone not found or unauthorized
If you selected Specific zone when creating the token in Cloudflare, ensure that the selected zone exactly matches the domain name you are syncing in MASACP. If managing multiple domains, re-create the token with All zones access.
Checking Live DNS Propagation
You can verify updated DNS records globally from the command line using standard dig or nslookup queries pointed directly at Cloudflare public resolvers:
dig @1.1.1.1 yourdomain.com A +short