A comprehensive guide to managing packet-filtering firewall rules, configuring automated Fail2ban brute-force jails for panel and SSH services, and enforcing zero-trust SSH access policies in MASACP.
Multi-Layer Network Perimeter and Service Defense
While Web Application Firewalls (WAFs) inspect incoming HTTP payloads on standard web ports (80 and 443), underlying Linux server daemons remain vulnerable to port scanners, credential stuffing, and SSH brute-force campaigns. Securing a hosting server requires defense-in-depth across the network layer (Layer 3/4) and service authentication layers.
MASACP integrates a unified security suite directly into the control panel, providing:
- Port Shield Firewall: Kernel-level packet filtering (iptables / nftables) for granular TCP/UDP port management and subnet isolation.
- Brute-Force Auto-Ban Warden: Real-time log monitoring (Fail2ban) that detects repeated failed authentications and blocks malicious IPs automatically.
- SSH Terminal Hardening: One-click cryptographic enforcement, port migration, and root-login deprecation.
1. Managing Port Shield Firewall & Port Rules
To review and modify network port exposure, navigate to the Firewall & Ports tab. The panel displays an active table of opened ports, allowed source IPs or CIDR subnets, protocols, and routing directions.
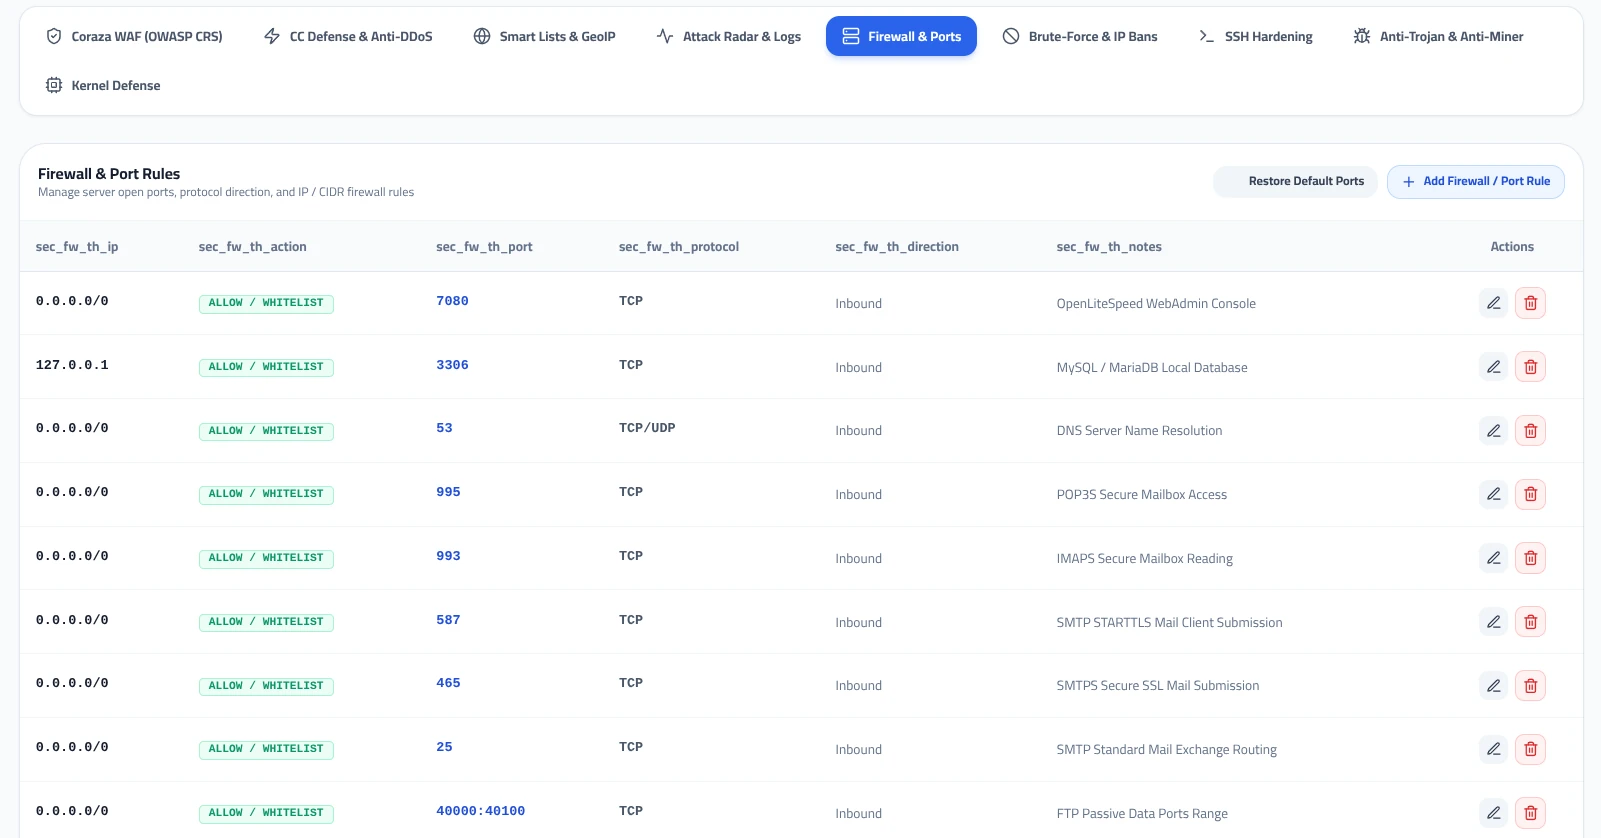
Core Baseline Port Allocations
MASACP preconfigures safe firewall rules tailored for enterprise web hosting:
| Source IP / CIDR | Port | Protocol | Service Description & Isolation Context |
|---|---|---|---|
| 127.0.0.1 | 3306 | TCP | MySQL / MariaDB local database listener. Strictly isolated to loopback to prevent external network probing. |
| 0.0.0.0/0 | 7080 | TCP | OpenLiteSpeed WebAdmin management console. |
| 0.0.0.0/0 | 53 | TCP/UDP | DNS Server Name Resolution (BIND9 / PowerDNS). |
| 0.0.0.0/0 | 25, 465, 587 | TCP | Postfix Mail Transport Agents (SMTP Routing, SMTPS SSL, and STARTTLS Submission). |
| 0.0.0.0/0 | 993, 995 | TCP | Dovecot IMAPS and POP3S secure mailbox retrieval. |
| 0.0.0.0/0 | 40000:40100 | TCP | Pure-FTPd passive data transmission port range. |
Adding and Managing Rules
- Add Firewall / Port Rule: Click the blue button in the top right to define custom port entries, restrict access to specific static office IPs (e.g., granting port
3306access only to a remote developer workstation CIDR), or open non-standard daemon ports. - Restore Default Ports: If accidental deletions or misconfigurations lock down required hosting services, clicking this button safely reinstates the default MASACP baseline ruleset.
2. Automated Brute-Force Defense & IP Ban Registry
Automated credential-stuffing bots routinely scan port 22 and administrative web interfaces. The Brute-Force & IP Bans tab provides automated jail automation that bans offending IPs upon detecting repeated authentication failures.
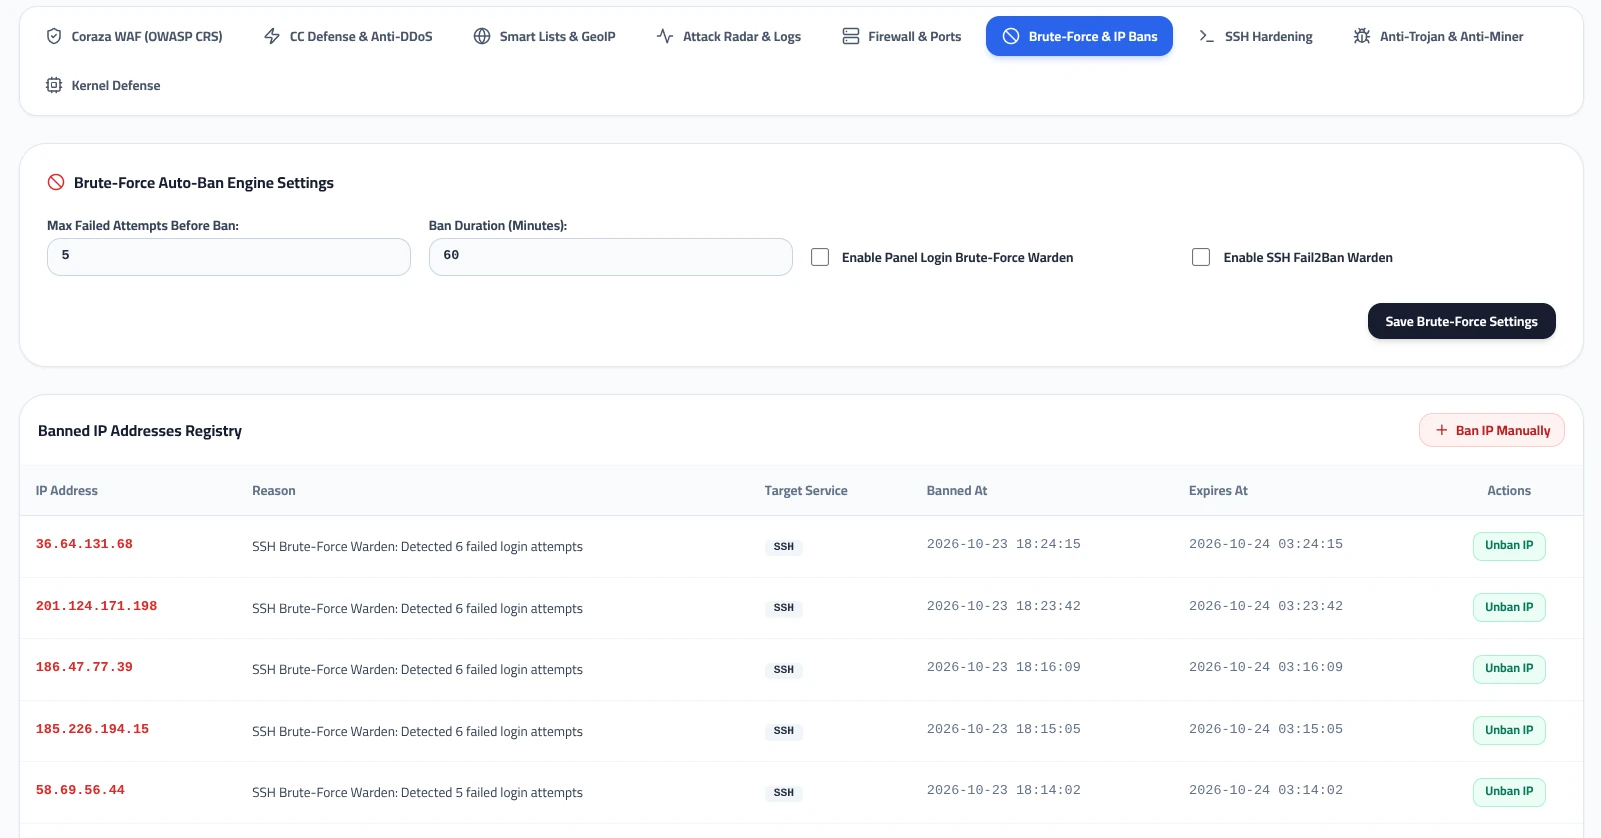
Auto-Ban Engine Parameters
Max Failed Attempts Before Ban
The number of consecutive invalid password submissions permitted within a detection window (e.g., 5 attempts). Once this threshold is reached, an immediate kernel-level drop rule is enforced.
Ban Duration (Minutes)
Duration of the active network drop (default: 60 minutes). For strict security environments, increasing this value to 1440 minutes (24 hours) effectively neutralizes persistent dictionary scanners.
Warden Protection Scopes
- Enable Panel Login Brute-Force Warden: Monitors authentication attempts against the MASACP web interface and API endpoints, neutralizing web-based account takeover attempts.
- Enable SSH Fail2Ban Warden: Integrates directly with OpenSSH authentication logs (
/var/log/auth.logor/var/log/secure) to automatically jail SSH dictionary attacks.
Banned IP Addresses Registry
The registry table logs all currently active bans, displaying the offender’s IP address, the triggered reason (e.g., SSH Brute-Force Warden: Detected 6 failed login attempts), the target service tag, exact timestamp, and scheduled expiration time.
- Manual Ban: Click + Ban IP Manually to immediately quarantine a known malicious IP or suspicious reconnaissance node.
- Instant Unban: If an administrator or legitimate client is inadvertently locked out, clicking Unban IP removes the firewall block instantly.
3. SSH Terminal Hardening & Zero-Trust Access
SSH is the primary administrative gateway to your Linux operating system. Leaving SSH on default settings exposes your server to non-stop automated dictionary attacks. The SSH Hardening tab enables administrators to apply critical defense configurations with automated firewall synchronization.
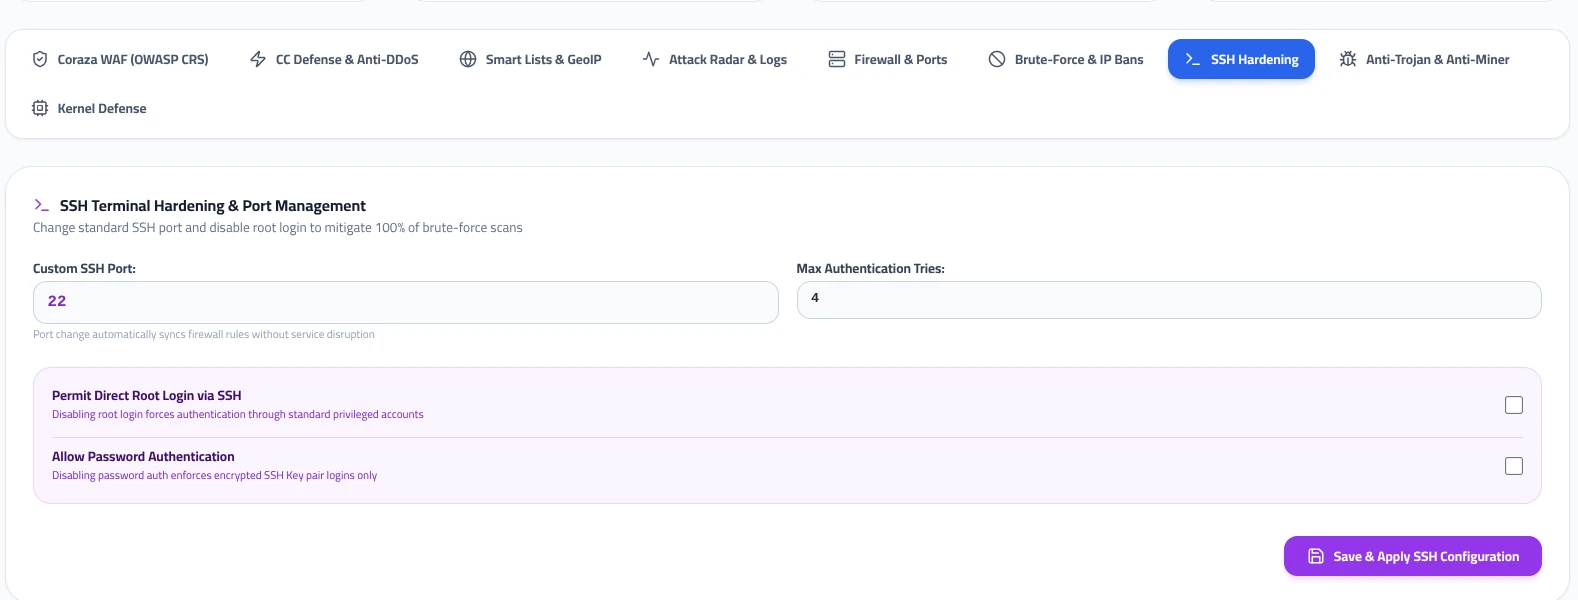
Custom SSH Port Migration
Migrating the SSH daemon from standard port 22 to a non-standard port (e.g., 2222 or 58222) eliminates over 99% of automated Internet-wide scanning noise.
Note: MASACP automatically syncs the Port Shield Firewall rules when you change the SSH port, opening the new port and closing the old one without causing connection drops or administrative lockouts.
Max Authentication Tries
Limits the number of failed authentication attempts permitted per single SSH connection handshake (e.g., 4 tries). Connections exceeding this limit are terminated by the daemon before completing the handshake.
Permit Direct Root Login via SSH
Disabling direct root logins forces administrators to log in using an unprivileged, named user account and elevate privileges using sudo. This creates an auditable trail and renders generic root credential attacks useless.
Allow Password Authentication
Unchecking this box completely disables password-based logins, requiring all SSH sessions to authenticate using cryptographic SSH public/private key pairs (such as Ed25519 or RSA 4096-bit). Once enforced, unauthorized actors cannot brute-force access even if they discover an account name.
Operational Safety & Lockout Prevention
Important Safety Guidelines
- Never Disable Password Authentication Without Verifying Key Access: Before unchecking Allow Password Authentication, ensure you have generated an SSH key pair, uploaded the public key to
~/.ssh/authorized_keys, and successfully logged in via your private key in an independent terminal window. - Maintain an Active Fallback Session: When changing the SSH port or disabling root logins, keep your existing active terminal session open while testing a new connection in a separate terminal:
ssh -p [NEW_PORT] [USER]@[SERVER_IP] - Whitelist Administrative Subnets: Add your office static IP address or corporate VPN egress IP to the IP Whitelist in both the Firewall and Brute-Force settings to prevent administrative lockouts during high-intensity operations.