A comprehensive guide to uploading and restoring database backups up to 2 GB using chunked disk streaming, native archive decompression, and server-side CLI execution without web server timeouts.
Overcoming Traditional Import Limitations
Traditional web-based database management tools (such as standard phpMyAdmin instances) frequently fail when importing medium-to-large database backups due to PHP execution time limits (max_execution_time), upload size ceilings (upload_max_filesize), or HTTP gateway timeouts (504 Gateway Timeout).
The integrated SQL Dumps & Import Manager circumvents these barriers through chunked browser-to-disk streaming and asynchronous command-line restoration directly against the MySQL daemon.
Up to 2 GB
Direct support for massive databases via chunked transfer.
Compressed Archives
Accepts .sql, .sql.gz, .zip, and .tar.gz archives directly.
Auto-Import
Executes database restoration automatically upon upload completion.
Step 1: Launching the SQL Dumps & Import Manager
To restore data into a specific database:
- Go to the Databases section in the control panel.
- Locate your destination database in the list.
- Click the Import Dump icon (upload icon) located in the Actions column on the right.
Target Verification Badge:
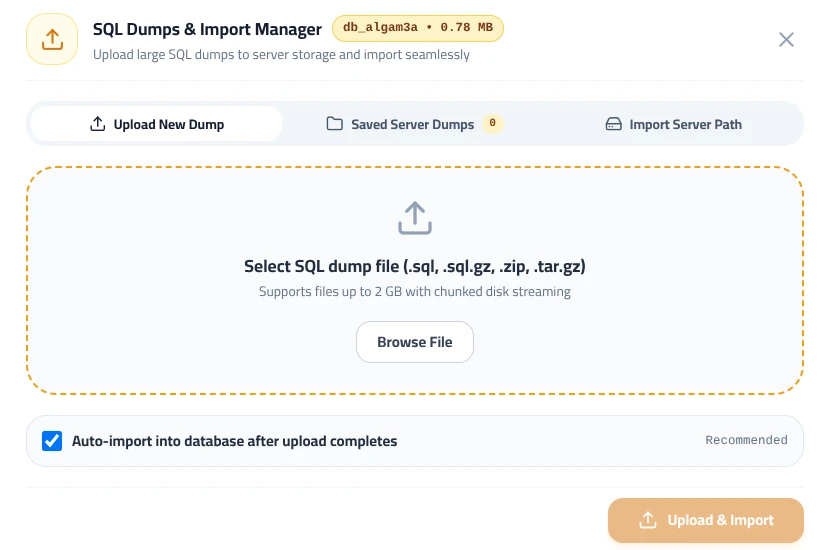
The manager modal highlights the target database name and its current storage consumption in an informational badge at the top (e.g., mysite_db • 0.78 MB), ensuring you never restore data into the wrong tenant database accidentally.
Step 2: Selecting the Import Method
The modal presents three navigation tabs suited for different deployment scenarios:
1. Upload New Dump (Default)
Allows you to upload a local database backup file from your computer. Files are processed in sequential chunks directly into temporary server disk storage, bypassing PHP memory overhead and supporting file sizes up to 2 GB.
2. Saved Server Dumps
Displays previously uploaded or system-generated backup files stored in the server backup repository. You can select and restore an existing snapshot without re-uploading data from your client device.
3. Import Server Path
Allows administrators to specify an absolute server filesystem path (e.g., /var/backups/dumps/production.sql.gz). Ideal for restoring extremely large databases transferred beforehand via SCP, SFTP, or Rsync.
Step 3: Uploading and Executing the Dump
To restore your database from a local file:
- Ensure the Upload New Dump tab is active.
- Click the Browse File button inside the dashed upload container, or drag and drop your dump file onto the upload zone.
- Ensure the option Auto-import into database after upload completes remains checked (recommended). This instructs the server to stream the file directly into MySQL immediately after upload.
- Click the brown Upload & Import button at the bottom right.
Automatic Decompression on the Fly:
If you upload compressed archives (.sql.gz, .zip, or .tar.gz), the engine extracts the SQL stream dynamically in the background without needing manual unpacking, saving up to 85% in upload transfer time.
Technical Best Practices for Database Restores
Follow these recommendations to guarantee complete data integrity and maximum restore speed:
| Best Practice | Why It Matters | Recommendation |
|---|---|---|
| Pre-compression (Gzip) | Raw SQL text files are verbose; gzip reduces file size by 75% to 90%. | Always compress raw .sql files to .sql.gz before uploading. |
| Collation Compatibility | Mismatches can corrupt multi-byte UTF-8 Arabic text or emoji characters. | Ensure dumps use utf8mb4 with utf8mb4_unicode_ci. |
| Table Overwrite Protection | Existing tables with identical names may conflict or cause key errors. | Ensure your dump file includes DROP TABLE IF EXISTS directives. |