A step-by-step guide to provisioning MySQL and MariaDB databases, creating dedicated users with automatic privilege mapping, configuring storage quotas, and managing master root access.
Database Management Overview
The control panel includes a streamlined database manager designed to eliminate manual command-line grant privileges. Creating a database simultaneously provisions a matching user, generates secure authentication credentials, maps permissions, and links the database directly to your chosen virtual host.
1-Click Creation
Generates database, dedicated user, and secure privileges in one operation.
Storage Quota
Imposes hard limits on database disk usage or allows unlimited allocation.
Site Linking
Binds databases to specific websites for organized multi-tenant tracking.
Step 1: Navigating the Databases Management Dashboard
From the main control panel sidebar, click on Databases. The main dashboard displays an inventory of all active databases, assigned users, masked credentials, allocated quotas, and associated websites.
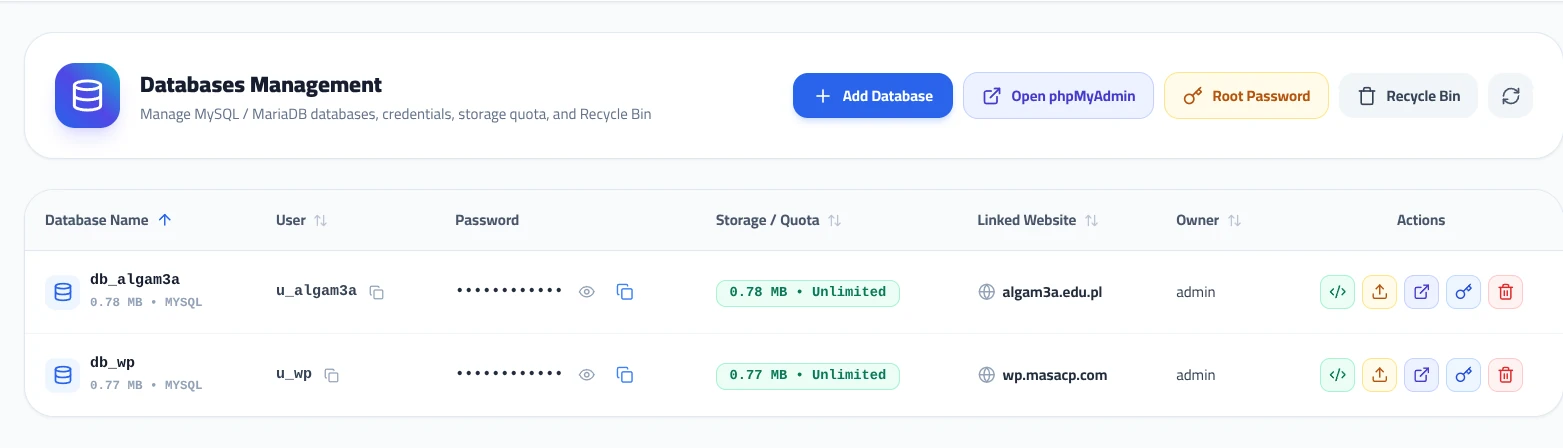
Key Management Actions:
- + Add Database: Launches the unified modal to provision a new database and user.
- Open phpMyAdmin: Provides single sign-on access to the web database administration suite.
- Root Password: Opens the master credentials modal to securely view status and update the server-wide MySQL root password.
- Recycle Bin: Stores safely dropped databases temporarily before permanent deletion to prevent accidental data loss.
Step 2: Creating a New Database & Assigning a User
To create a new database along with its authentication credentials:
- Click the blue + Add Database button in the top action toolbar.
- Fill out the configuration fields in the modal:
- Database Name: Enter the database name identifier (e.g.,
mysite_db). - Database User: Enter the corresponding username (e.g.,
mysite_user). - User Password: Enter a strong password, or click Generate Strong Password to create a cryptographically secure string.
- Allocated Quota (MB): Set a storage ceiling in megabytes, or enter
0for unlimited quota. - Link to Website (Optional): Select an existing domain from the dropdown to associate this database with that virtual host.
- Database Name: Enter the database name identifier (e.g.,
- Click Save Changes to execute creation.
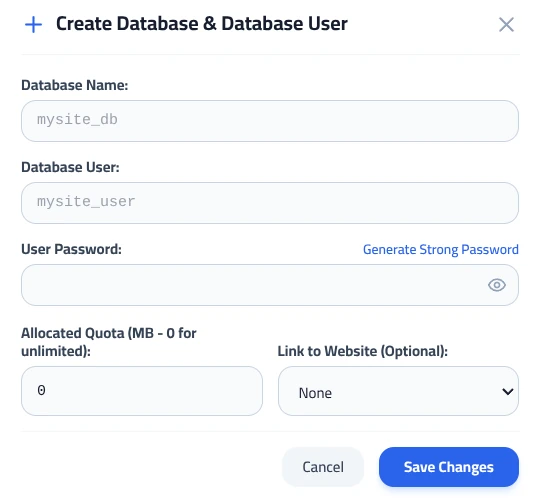
Automatic Privilege Granting:
The control panel automatically issues GRANT ALL PRIVILEGES on the newly created database to the created user for local connections (localhost), ensuring instant compatibility with CMS configuration files like WordPress wp-config.php.
Step 3: Viewing and Changing Database User Passwords
Credentials can be inspected or rotated directly from the databases table without accessing configuration files:
- View Password: Click the eye icon next to the masked password dots in the row to temporarily reveal the plaintext password.
- Copy to Clipboard: Click the copy icon next to the username or password to copy the string directly.
- Change Password: Click the key icon in the Actions column to open the Change Database User Password modal.
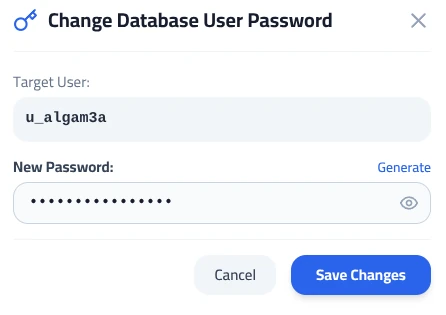
Important Notice on Application Configuration:
If you change a database user password, you must immediately update the corresponding configuration file in your website (such as wp-config.php or Laravel .env) to avoid Error establishing a database connection.
Step 4: Managing the MySQL Master Root Password
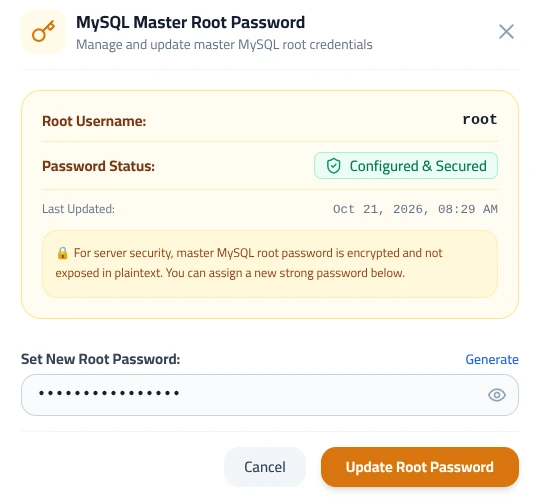
For advanced server operations and administrative backups, the control panel maintains the master MySQL root credentials:
- Click the yellow Root Password button in the top action bar.
- Review the current password status badge (
Configured & Secured) and timestamp of the last update. - To rotate the master password, enter a new password in the Set New Root Password field or click Generate.
- Click Update Root Password to apply changes to the underlying MySQL / MariaDB server daemon.
Database Row Action Icons Summary
Each database listed in the table contains five action buttons on the far right:
| Action Tool | Functionality | Target Modal / Outcome |
|---|---|---|
| Connection Snippet (</>) | Displays ready-to-use PHP, Python, and Node.js connection code blocks. | Connection helper dialog. |
| Import Dump (Upload Icon) | Uploads and executes SQL/GZ dump files directly into this specific database. | SQL Dumps & Import Manager. |
| Open Studio (External Link) | Opens the integrated phpMyAdmin Web Studio focused directly on this database. | phpMyAdmin Web Studio view. |
| Change Password (Key Icon) | Rotates the password for the assigned database user. | Change Database User Password modal. |
| Drop Database (Trash Icon) | Moves the database to the Recycle Bin for safe deferred deletion. | Confirmation prompt and Recycle Bin archive. |