Installing MASACP takes less than two minutes. The entire deployment process is fully automated through an authenticated single-line command that sets up your web servers, PHP pools, security firewalls, and database services.
Prerequisite: Before proceeding, ensure your server runs a clean installation of Ubuntu 24.04/22.04 or Debian 12 with root SSH access.
Step 1: Generate Your Verified Installation Command
Software packages and updates in MASACP are cryptographically signed and tied to your licensed server IP. To generate your unique installation command:
- Log in to your MASACP Client Portal and navigate to your active license.
- Click the Generate SSH Install Command button.
- Enter the Public IPv4 address of your fresh Linux server and click Confirm IP & Generate Command.
- Click Copy Command to copy the ready-to-run installation string.
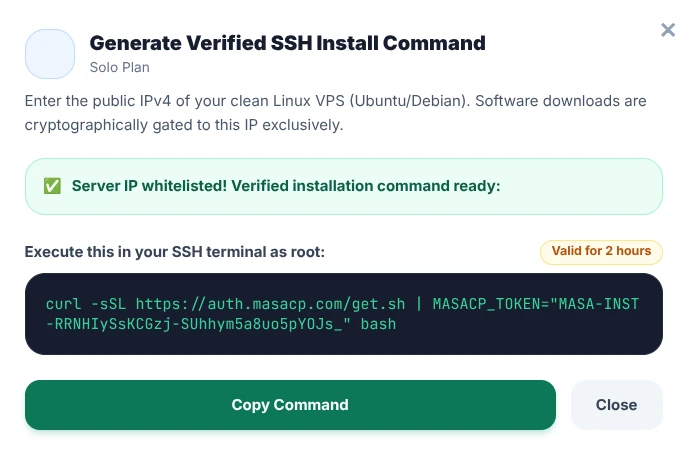
Security Notice: The generated installation token is valid for 2 hours and cryptographically restricted to your server’s public IP address.
Step 2: Connect to Your Server via SSH
Open your terminal (Terminal on macOS/Linux, or PowerShell / PuTTY on Windows) and connect to your server as the root user:
ssh root@your-server-ipStep 3: Run the Installation Command
Paste the command you copied from the portal into your terminal and press Enter:
curl -sSL https://auth.masacp.com/get.sh | MASACP_TOKEN="YOUR_GENERATED_TOKEN" bashThe installer will verify your cryptographic token, update your package repositories, and initialize the automated setup environment.
Step 4: Interactive Quick Configuration (5 Prompts)
Before starting the automated compilation, the installer will ask you 5 simple configuration questions to tailor the installation:
- Panel Domain: Enter the fully qualified domain name (FQDN) you want to use to access the control panel (for example:
demo.masacp.comorcp.yourdomain.com). If you do not have a domain ready yet, simply press Enter to use the server’s public IP address. - Admin Username: Enter your desired administrator username (default:
admin). - Admin Email: Enter your email address to receive emergency server alerts and SSL renewal notifications.
- Admin Password: Type a strong custom password, or press Enter to accept the secure auto-generated password displayed on screen.
- Free Let’s Encrypt SSL: If you specified a domain that is already pointing to your server IP, type
y(or press Enter) to automatically issue a trusted Let’s Encrypt SSL certificate during setup.
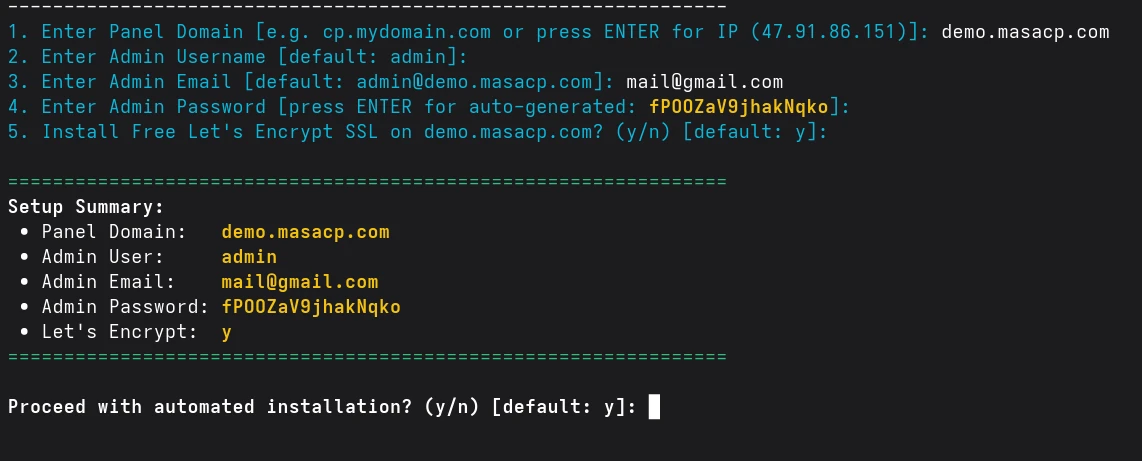
Once you review the Setup Summary, press Enter (default: y) to proceed with automated installation.
Step 5: Access the MASACP Control Panel
The installer will now configure the services, install web server engines (Nginx, OpenLiteSpeed), set up MariaDB, and activate security firewalls. When installation finishes, your access credentials will be printed on screen:
- Control Panel URL:
https://your-domain.com:8443(orhttps://your-server-ip:8443) - Username:
admin(or your custom username) - Password: Your chosen or generated password
Next Step: Open the panel URL in your web browser and log in with your credentials to explore the dashboard.